


下载
Getting started with the Arduino Due
To connect the Arduino Due to your computer, you'll need a Micro-B USB cable. The USB cable will provide power
and allow you to program the board.
Attach the USB micro side of the USB cable to the Due's
Programming
port (this is the port closer to the DC power
connector). To upload a sketch, choose Arduino Due (Programming port) from the Tools > Board menu in
the Arduino IDE, and select the correct serial port from the Tools > Serial Port menu.
The Due has a dedicated forum
for discussing the board.
On this page... (hide
)
Differences from ATMEGA based boards
Voltage
Serial ports on the Due
Automatic (Software) Reset
USB Host
ADC and PWM resolutions
Expanded SPI functionality
Installing Drivers for the Due
OSX
Windows (tested on XP and 7)
Linux
Uploading Code to the Due
Differences from ATMEGA based boards
In general, you program and use the Due as you would other Arduino boards. There are, however, a few important
differences and functional extensions.
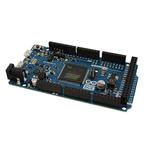
The Due has the same footprint as the Mega 2560.
Voltage
The microcontroller mounted on the Arduino Due runs at 3.3V, this means that you can power your sensors and
drive your actuartors only with 3.3V. Connecting higher voltages, like the 5V commonly used with the
other Arduino boards will damage the Due.
The board can take power from the USB connectors or the DC plug. If using the DC connector, supply a voltage
between 7V and 12V.
The Arduino Due has an efficient switching voltage regulator, compliant with the USB host specification. If the
Native
USB port is used as host by attaching a USB device to the mirco-A usb connector, the board will provide the
power to the device. When the board is used as a usb host, external power from the DC connector is required.
Serial ports on the Due